
Meta Business Manager Verification: Step-by-Step Guide

Updated: Aug 11

Which verification methods are available in Meta Business Manager?
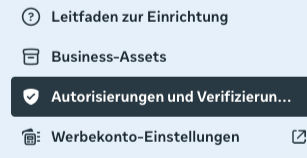
Meta Business Manager offers several types of verification that can either be optional or required, depending on your account and your country's regulations.
You can find all available verification options under Authorizations and Verifications, located at the bottom of the Business Settings menu.
Depending on your country, you may see additional verification options. However, don't worry—you won't need to complete all of them.
The most important verification types are:
Business Verification
Identity Verification
Phone Number Verification
These are the verification methods most businesses encounter when managing Meta Ads professionally.
Why do I need to verify my business in Meta Business Manager?
Under certain circumstances, Meta requires you to verify your business. This is typically necessary if you:
Want to become a Meta Business Partner
Manage high advertising budgets
Run ads in special ad categories
Have your account restricted as a precaution
Want to set up a WhatsApp Business Account
In these cases, you'll need to verify the legitimacy of your business using official company documents.
You can find the verification option under Business Info. By default, your verification status will show as "Unverified." There, you'll also find a "View Details" link, which takes you to Meta's Security Center, where you'll be guided through the verification process.

If business verification is required, Meta will display the reason in the dropdown menu along with a blue "Start Verification" button.

This option is only available when verification is actually required. If Meta doesn't require verification for your business, the feature won't be available, and completing verification will not unlock any additional features.
How do I verify my business in Meta Business Manager?
If Meta requires business verification, you'll receive a notification. To complete the process, you'll need to upload an official business document and verify either your business phone number or your business email address.
Follow these steps:
Go to Authorizations and Verifications.
Select "Verify yourself or an organization."

Choose the appropriate ad account (even if you're verifying your business) and click "Start Verification."
Click "Get Started."
Select "Verify an Organization."
Choose your organization's location.
Enter your business information. If you plan to verify using your phone number, make sure it appears on an official business document. If you'd rather verify by email, enter your website. Your email address must use the same domain as your website.
Upload an official business document showing your company information.
Choose your preferred verification method.
Enter the verification code you receive.
Done!
You'll usually receive Meta's decision within 48 hours.
You can track all verification requests and their status in the dropdown menu of your ad account.
How do I verify myself as an individual in Meta Business Manager?
If Meta requires you to verify your identity, you'll receive a notification. This is not the same as Meta Verified (the blue verification badge).
To verify your identity:
Go to Authorizations and Verifications.
Select "Verify yourself or an organization."
Choose your ad account and click "Start Verification."
Click "Get Started."
Select "Verify Yourself."
Choose the country shown on your government-issued ID.
Enter your full legal name exactly as it appears on your ID (including middle names).
Select the type of government-issued ID you'll use.
Upload a photo of your ID.
Done!
Identity verification may take up to 48 hours.
You can monitor the verification status at any time from your ad account's verification menu.
How do I verify my phone number in Meta Business Manager?
Meta has recently introduced an additional verification step.

Before launching your first campaign, you may be asked to verify your phone number.
This request appears directly in Ads Manager while creating your first campaign.
Simply enter your phone number, request a verification code, and enter the code once you receive it. After that, you're ready to launch your campaigns.
How do I verify my domain in Meta Business Manager? (Outdated)
Good news: Domain verification is no longer required in Meta Business Manager.
However, you can still verify your domain by navigating to:
Business Settings → Brand Safety & Brand Suitability → Domains

You also no longer need to claim ownership of your domain.
Instead, simply install the Meta Pixel on your website to track conversions. In my dedicated guide you can learn how to set up the Meta Pixel.
Need help verifying your Meta Business Manager?

If you need assistance with business verification, I'd be happy to help.
As a Meta Certified Media Buying Professional, I've guided businesses through the verification process hundreds of times.
During a live video call, I'll walk you through every step to ensure your Business Manager is set up correctly and your verification is completed successfully.


Comments