Meta Business Manager Setup in 2026
- Frederic Wolny

- Dec 3, 2025
- 19 min read
Updated: 5 days ago

Content Table
What is the Meta Business Manager?
Meta Business Manager is the account for advertisers who want to place ads on Facebook, Instagram, Threads, and WhatsApp. The big advantage is that you can manage all the components (“assets”) for this in one account: Facebook page, Instagram account, advertising account, pixels, payment methods, etc.
Definition:
Officially, Meta refers to it as “Business Portfolios”, but the term “Meta Business Manager” is more commonly used.
The Meta Business Manager is essentially your company account on Meta.
What are the requirements for the Meta Business Manager setup in 2026?
The Meta Business Manager interface has never been user-friendly.
Most people want to start running their ads right away—but Meta puts the brakes on and says, “Hold on a minute. First, I want to make sure that there's a real person and a real company and a real payment method behind your ad account.”
Of course, Meta wants to avoid running ads that no one ends up paying for.
That's why there are some security requirements that need to be taken.
Setting up your personal Facebook profile
Yes, you read that correctly. The first requirement is your old Facebook profile.
Important: You can only create a Meta Business Manager using a personal Facebook profile.
These requirements are essential for setting up your Meta Business Manager:
You can only have one Facebook-profile
Many people feel the urge to create a second, business related profile on Facebook. However, this violates Facebook's Community Guidelines. Doing so may result in your profiles being blocked. This brings us to point two:
Your personal Facebook-profile may not be blocked.
Don't create a second Facebook-profile if your first profile has been blocked, because Meta can easily identify you via your devices and IP address, which will quickly lead to your second profile being blocked. In extreme cases, try to unblock your first account with the help of support. Or use a family member's Facebook-profile. (I didn't say that out loud.)
Your Facebook-profile needs your real full name.
This simply means that you have to enter your real first and last name. No abbreviations, no fantasy names. If you only use Facebook privately, it doesn't matter, but as soon as you want to place ads, you have to be clearly identifiable. You don't need a profile picture. Why this is so important: In case of unusual activity, you have to verify your personal Facebook-profile with your ID card. If you haven't followed my advice, this is where it ends for you. For Meta, it's also considered unusual activity if your profile has been unused for a long time and suddenly wants to set up a Meta Business Manager.
Your Facebook-profile must be protected by two-factor authentication (2FA).
This is the most important security measure for your profile. This prevents unauthorized access to your profile and, later on, to your Business Manager, because we will make 2FA mandatory for all members of your Business Manager. You can find out how to set up 2FA for your Facebook profile here.
You must agree to personalized advertising on Meta. (Ad preferences)
The rule at Meta is simple: if you want to show personalized ads, you must also allow to receive them. You can set this up in your profile under Account/Settings/Settings&Privacy/Account Overview/Ad Preferences.
You have to:
Agree to advertising in general
Enable personalized advertising:
Keep your Instagram profile in mind.
You don't need a personal Instagram profile. You can simply create one for your brand. There are two things you need to keep in mind for Instagram:
Remember to protect it with two-factor authentication (2FA). You can now also log in to Business Manager using your Instagram account.
You must also have agreed to personalized ads in your Instagram profile.
Keep your passwords and email adresses ready.
You will need access to your Facebook, Instagram, and email accounts for this process. Have your passwords ready, as you will need to log in to each account and confirm various verification emails.
Add your business email adress to your Facebook account.
Until now, it wasn’t strictly necessary, but now it’s mandatory. Meta is further tightening access to Business Manager.
Therefore, you and all your employees should add your business email address to your Facebook accounts.
You can set this up in your Facebook profile under Account/Settings/Settings & Privacy/Account Overview/Contact Information.
Click on Contact Information. Here you’ll find all the email addresses and phone numbers you can use to log in.
Click on Add Contact Information.
Select Add Email Address.
Enter your business email address.
You will now receive a code at your business email address.
Enter the code.
You will then receive another code at your primary email address.
Enter the code.
Done!
Your employees should also add their work email addresses to their accounts.
That way, you can send invitations to their work email addresses.
Note:
I mean in the Account Overview, not on your public Facebook-profile. No one can see the email addresses you’ve added except you.
New in 2026: Passkeys for Meta
Recently, you may have been required to create a passkey to verify your identity. If this applies to you, you will be notified.
If your personal Facebook profile is suspended, you will no longer be able to run ads on Meta.
Reactivation is only possible within 180 days of the suspension, and depending on the violation, it may not be possible at all.
That’s why you should follow all safety guidelines from the very beginning.
Prepare you payment method for the Meta Business Manager
Your payment method is the most important basis for placing Meta Ads, alongside your Facebook profile.
The following points should be noted here:
Use your credit card or PayPal.
Use either a credit card or a PayPal account. If using a credit card, make sure it is enabled for online purchases. If necessary, you can also place ads using prepaid credit. However, this is not recommended, as the campaign will end as soon as the budget is used up. You want to avoid this if you want to place ads continuously. Never use direct debit for payment. This is far too risky and can quickly lead to your payment method being blocked. This brings us to point 2:
Always ensure that you have sufficient funds available for your payment method.
Always ensure that you have sufficient funds available on your payment method to cover Meta's direct debits. Failed payments are the quickest way to have your advertising account, profile, and, in the worst case, your payment method blocked.
It is almost impossible to unblock a blocked payment method.
Your payment method may not be blocked.
If too many payments fail, Meta will block your payment method. You’ll then need to contact support to have it unblocked.
Don’t simply create a new advertising account or a new Business Manager.
Payment method blocks are always tied to the specific payment method and apply across all Business Managers.
This means you cannot use a blocked payment method in a new Business Manager.
How do I create the Meta Business Manager?
Once all of the above points have been fulfilled, you can finally get started.
This is how you set up the Meta Business Manager:
Go to www.business.facebook.com and log in. If you do not yet have a personal Facebook profile, you will need to register here first.
Click on “Create Account.”
Please note: Each user can only create two Business Managers.
If you have already created two Business Managers, you will now receive an error message. Please either ask your business partner to create the Business Manager via their account or use an existing Business Manager.
Enter the name of your company, your own name, and your business email address in the pop-up window and click on “Submit.”
You will then receive a verification code via email at your address, which you must confirm.
You can also read about this directly on Facebook: (source)
Not sure if you should really set it up by yourself?
How do I log into the Meta Business Manager?
There are two ways for you to log in to your Meta Business Manager:
Log in with your personal Facebook profile
This is the standard method and should always be used.
You will have access to all Business Managers connected to your Facebook profile.
Log in via Instagram
You can now also log in to the Meta Business Manager using your Instagram account.
However, this only works if the Instagram account has already been added to Business Manager.
You will also only have access to the Business Manager your instagram account is connected to.
Access should be restricted to prevent unauthorized access.
You can also switch off this option in the settings.
NOTE: You can grant the Instagram account access to all assets in Business Manager just as you would with a Facebook profile.
However, you cannot grant the Instagram account full admin access.
The status always remains “Everything (except sensitive actions)”

What are sensitive actions?
The million dollar question.
Unfortunately, I haven’t found an explicit list of these; Meta only mentions:
Deleting a Facebook Page
Running ads (based on my experience)
That’s why I always recommend granting access via a Facebook profile.
Note:
Always log in on your laptop or pc, the access via mobile is very restricted.
You can find both options on the homepage at http://www.business.facebook.com/
How do I set up the Meta Business Manager?
After the creation you can continue with the setup.
First, Meta takes you back to the Meta Business Suite. From there, click the “Settings” button at the bottom left to switch to the new Business Manager view.

Bonus tip: Bookmark all the important URLs to save yourself a lot of time—the internal linking between the tools is terrible.
Your first actions in the Meta Business Manager should be:
Adding a second administrator as a backup
Either another person from the company or your service provider. You can find the settings under Settings/People. Always make sure that at least two people are listed as administrators in your Business Manager in case one person loses access or is blocked. To learn how to add someone in Business Manager, see: Adding people.
Set the 2FA as mandatory for all members of Business Manager
Under Company Information, you will also find the Business Options section. Under “Two-Step Authentication” select “All” from the drop-down menu. This means that anyone who wants to access the BM must authenticate themselves with 2FA. This is the best protection against misuse of your advertising accounts.

This will protect your Business Manager from the most significant risks, such as account suspensions and hacker attacks.
Adding the company information
On this page, you can configure all settings related to your Meta Business Manager.
In the first section, you can add the primary Facebook Page for your Meta Business Manager and change the logo for your Meta Business Manager. You’ll also find your Business Portfolio ID there.

In the second section, enter all the information about your business. This includes your business name, address, phone number, website, and VAT ID under the “Tax ID” heading.
The next step is adding assets to the Meta Business Manager
All components of your Business Manager are called “assets.” These include advertising accounts, Meta pixels, Facebook pages, and Instagram accounts.
You can now create these one by one. We'll start with at the top:
Adding Users: This is how you give access to the Business Manager
Here, you can invite users who should have access to Meta Business Manager along with you. You can add individual people, external partners such as agencies or freelancers, or system users.
As soon as you click on a menu item, you'll always see in the left column which individuals or partners currently have access to your Meta Business Manager. In the right column you can see what assets somebody has access to.
How to add people to the Meta Business Manager:
Click on the blue button: “+ Invite people”.

In the pop-up window, enter the email address of the person you want to invite.
Important: The invited person must have this email address stored in the contact information of their accounts center.
Not publicly in their profile!

Once you have entered the email address, you can assign access rights to the person.

You can choose between limited and unlimited control.
Limited control means that the person can only edit the assets that have been assigned to them. They cannot add or remove anyone from Business Manager. This is useful for employees and external parties.
Unrestricted control is admin access. This access should only be given to key employees.
In addition, you can also grant rights for financial management. This is useful for accounting.
Next, the assets must be assigned. This point is confusing for many people. There are three columns here: asset types, assets, and the respective permissions. You can only proceed here if you select an asset and then permissions for each business asset type you select:
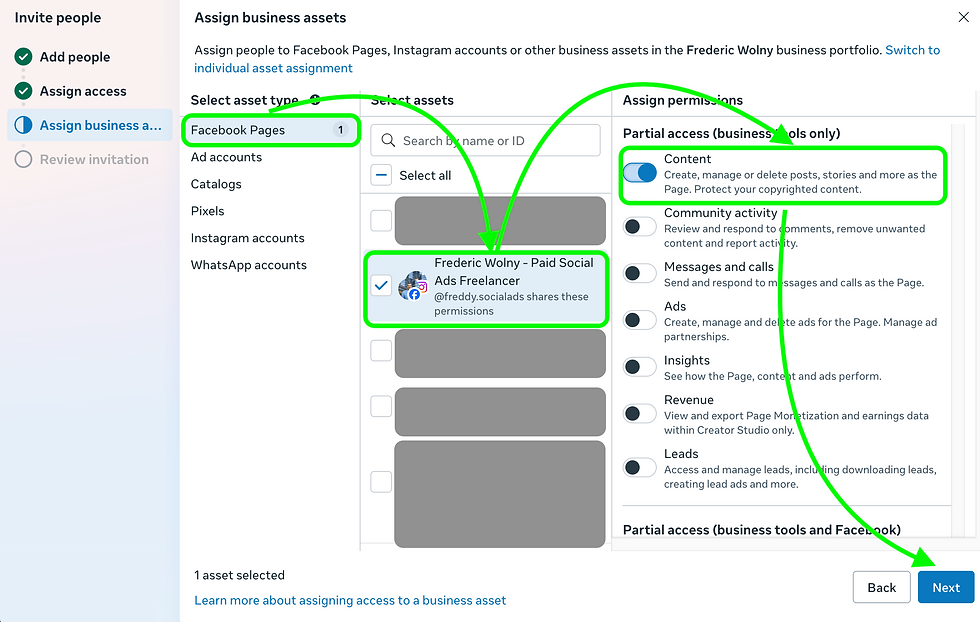
Now go through all the asset types. If you have forgotten anything, the “Continue” button will be grayed out.
Finally, you need to review and send the invitation.
How to add partners to the Meta Business Manager:
To grant a partner access to your Meta Business Manager, two conditions must be met. Your partner must have a Meta Business Manager account, and you need their Business Portfolio ID. You can find this in the company information.
Here’s how to add a partner:
Go to Users/Partners and click the blue “+Add” button.

Now select “Allow a partner to access your assets”. Here, you can also request access to a partner’s assets.

Now enter your partner’s Business Portfolio ID.

Select the assets to which your partner should have access.
Your partner will now receive an access request via email.
Once your partner has accepted your access request, they will appear as a partner in your partner list.
Done!
How to add system users to the Meta Business Manager:
System users are essentially technical accounts that allow servers or software to automatically access data and features in your Business Manager—for example, via APIs.
Note: Not all companies have access to system users.
In the Users tab in the left sidebar, select System Users.
Click Add New System User.
Set a name for the system user and click Create System User.
Assign assets to the system user.
Click Generate New Token.
Select your app and permissions, then click Generate Token.
Copy and save your token.
Keep in mind that you can only share a token once. Each new system user requires a newly generated token.
Done!
Find more information here.
Additional security measures
If you change the access rights for individuals, you will usually have to verify your own email address again for security reasons.
Adding or deleting an individual often has to be confirmed by a second administrator. That's why you always need at least two administrators in Business Manager.
FAQ on Access and Control:
I received an invitation to Meta Business Manager. What should I do next?
It’s simple:
Go to your email inbox.
Open the invitation.
Click on the link in the invitation.
Facebook will open in your browser.
If you aren’t logged in yet, you’ll need to log in to Facebook now.
Then you’ll need to specify the name and email address you want to be visible with internally in Business Manager.
Done. The Business Portfolio will appear in your selection.
Can I revoke someone’s access?
Yes, if you have admin rights:
Go to the Users/People section.
Search for the person you want.
In the name bar, you’ll find the menu (...) on the right side.
In this menu, you can remove permissions or completely remove the person from Business Manager.
Can I revoke my own access or leave a Business Manager?
Yes, you can.
To do this, select yourself from the list of people and click the three dots on the right. You’ll then see the “Leave Business Portfolio” option.
However, this only works if you have admin rights.
If you don’t have admin rights, you can click “Leave Business Portfolio” under Company Info.
Adding Accounts
Adding pages
This refers to your Facebook pages. If you already have a Facebook page, you can claim it in the Pages section.
To do this, simply click on the blue button: “+ Add.”
You can choose one of these 3 options:
Add an existing Facebook Page
If you want to claim an existing page, simply search for the page’s name and then claim it.
There are two things to keep in mind:
Each Facebook Page can only be assigned to one Business Manager.
You need admin rights for the Facebook Page.
If either of these conditions is not met, you will receive an error message. Facebook will tell you what is missing.
So, if you want to transfer the existing Facebook Page to the new Business Manager, you also need access to the Business Manager to which the Facebook Page is currently assigned.
Request access to a Facebook Page
This option is useful for agencies that want to manage Facebook Pages for their clients. Access to the Facebook Page is granted, but it remains linked to the original Business Manager.
Create a new Facebook Page
If there isn’t already a Facebook Page for your business, you can simply create a new one here.
Each ad account needs a Facebook page in order to run ads on Facebook.
Adding Ad accounts
The heart of your Meta Business Manager. This is where you’ll create and manage campaigns later on.
Here, you can claim existing ad accounts or create a new one.
To do this, simply click the blue “+ Add” button
Then choose whether you want to add an existing ad account, request access, or create a new ad account.
Important: Once an ad account has been created, it cannot be moved. So always use Business Manager to create an ad account only for the person who is supposed to be the account owner.
FAQ on ad accounts:
Can I move an existing ad account from one business manager to another?
No, that is not possible.
Where can I see the current limit of ad accounts in the business manager?
You can see this under “Company Info.” Your limit increases gradually as you spend more on advertising.
Closed and suspended advertising accounts are also included in this total.
Adding business asset groups
With Business Asset Groups, you can group and organize your assets in Business Manager—just as the name suggests.
Instead of granting each user individual access to every asset, you can grant users access to an entire group with a single click.
The benefit: You save time, avoid errors, and always keep track of who has access to what.
Especially in larger setups, with multiple clients, or when collaborating with agencies, Business Asset Groups are a key component for clean and scalable structures.
However, this feature is rarely used in practice.
Adding Instagram-accounts
This refers to your Instagram accounts. If you already have an Instagram account, you can simply add it in BM.
To do so, just click on the blue button: “+ Add”, accept the Meta guidelines, and log in to Instagram.
After successfully logging in, your account will appear in the overview.
Your advertising account needs an Instagram account to run ads on Instagram.
Where can you add your Threads account to the Meta Business Manager?

You don't need to connect your Threads account separately. If you created your Threads profile via your Instagram account, it should be automatically connected.
You can tell this is the case if you can select your Threads account in the Ads Manager at the ad level.
If the drop-down menu does not appear yet, the feature has not been rolled out to you yet.
You can only run ads on Threads if you have a Threads account connected.
Adding WhatsApp-accounts
You can now easily add WhatsApp Business accounts to your BM.
To do so, simply click on the blue button: “+ Add”.
You can choose whether you want to add an existing account or create a new one.
A confirmation code will be sent to your WAB, which you must enter in the BM, and you're done.
If you have a WhatsApp account connected, you can run Click-to-WhatsApp ads.
How can I add a payment Method to the Meta Business Manager?
In addition to the advertising account, you will of course need a payment method, as mentioned above. You can add this in the “Billing and Payments” section.
Under Accounts, you can add a payment method to your advertising account.
Under Payment Methods, you can also add a payment method centrally in your BM and use it for multiple advertising accounts in your BM.
For most use cases, however, one payment method at the account level is sufficient.
Important: Use either PayPal or a credit card, never direct debit.
How can I add a data source to the Meta Business Manager?
If you want to track conversions on your website, you absolutely need a Meta pixel.
Only Meta Instant Leads and Click-to-WhatsApp campaigns do not require a pixel.
However, I always recommend using the meta pixel in order to be able to track website conversions.
Further settings
You can also add business asset groups, commerce accounts, and apps. However, these settings are probably less relevant to you at this stage.
Connecting Assets
Connecting your Facebook page with your Instagram account
An important detail that is often forgotten: you still need to connect your Facebook page to your Instagram account.
This is how you connect your Facebook page with your Instagram account
To do this, you need to exit the Instagram app and go to your Page settings. On your PC or laptop, open facebook.com in your browser and select the Facebook Page you want to link to your Instagram account:

Make sure your desired Facebook Page is selected in the top-right corner. Go to your Facebook page. In the left column, you’ll find the “Settings” option.

Go to your page and then to "Settings".
There you’ll find the “Linked Accounts” section. Here you can link your Instagram account and a WhatsApp number to your page:

Under “Linked Accounts,” you can link Instagram and WhatsApp to your Facebook page.
For Instagram, you’ll be asked to log in again. After that, the accounts will be linked. If everything worked, it will look like this:
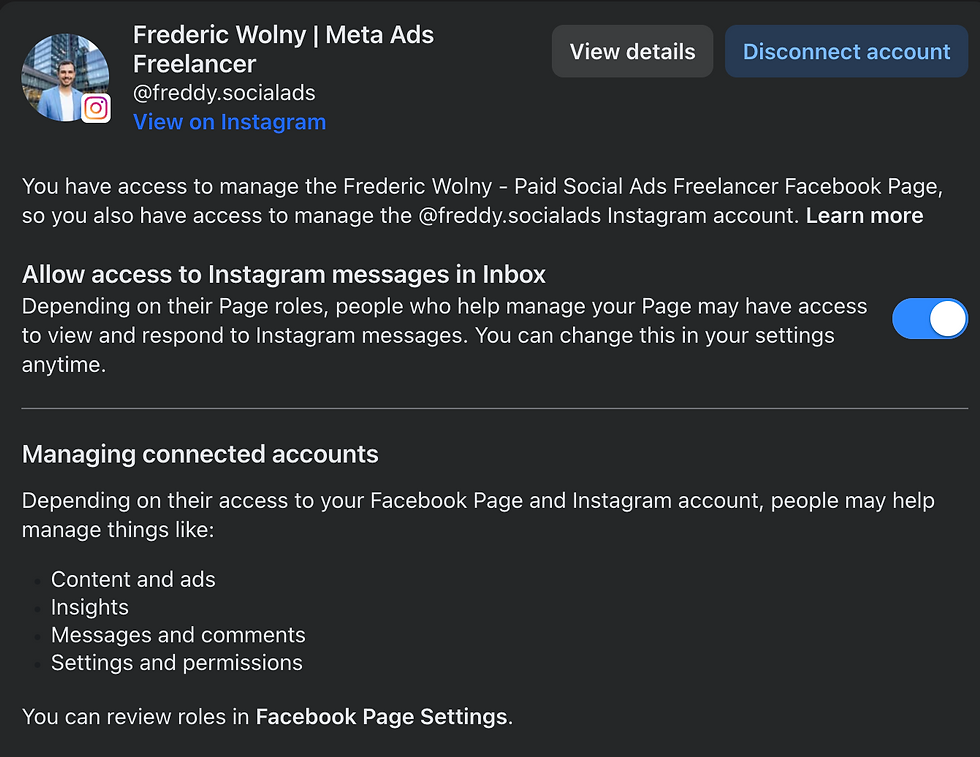
This is what it looks like when the accounts are linked.
What types of verifications exist in the Meta Business Manager?
There are several items in your Meta Business Manager that can or must be verified. You can find these under “Authorizations and Verifications” at the very bottom of the menu.
Depending on your country, there are a number of different verifications—but don’t worry, you don’t have to complete them all.
The most important verifications are those for your business, your personal information, and your phone number.
Why do I have to verify my business in the Meta Business Manager?
Under certain circumstances, you will need to verify your Meta Business Manager. This is usually the case if you:
Want to become a Meta Business Partner
Want to manage large budgets
Want to place ads for special ad categories
Have been blocked right away after the creation
Want to add a WhatsApp Business account
In this case, you will need to verify the authenticity of your business using your business documents. You can find this feature in your business information. By default, the status is set to “unconfirmed.” There you will also find a link called “View details” that will take you to the Security Center, where you will be guided through the verification process.

This feature is only enabled if you need to verify your business. If you don't need to, the option will not be available to you. It does not enable any additional features.
How can I verify my business in the Meta Business Manager?
If you need to verify your business in Meta Business Manager, you'll see a prompt. To do this, you'll need to upload a business document and confirm either the phone number listed on it or your email address.
Verify your business:
Go to “Authorizations and Verifications”.
Select the top option: “Verify yourself or an organization”
Select the desired advertising account (even if you want to verify your business) and click “Start verification.”
In the pop-up, click the “Let's get started” button.
In the next menu, select: “Verify an organization.”
Select your organization's location.
Add the company details. If you plan to use a phone number for verification, make sure it appears on an official document. If you want to use your email address, you can provide your website. The email address must be linked to the domain.
Upload a business document that shows the company details.
Select your verification method.
Enter the code from your verification method.
Done!
You will receive your result within 48 hours at the latest.
You can now view every verification request in the dropdown menu of your advertising account. There, you can also track the status.
How can I verify myself as a person in the Meta Business Manager?
If you need to verify yourself as an individual in Meta Business Manager, you'll see a prompt. This is not the Meta Verified verification process for the blue checkmark.
Verify your personal identity in the Meta Business Manager:
Go to “Authorizations and Verifications”.
Select the top option: “Verify yourself or an organization”
Select the desired advertising account (even if you only want to verify yourself as an individual) and click “Start verification.”
In the pop-up, click the “Let's get started” button.
In the next menu, select: “Verify yourself.”
Select the country listed on your ID.
Enter your name exactly as it appears on your ID (including middle names).
Select the government-issued ID you want to use for verification.
Upload a photo of your government-issued ID.
Done! It may take up to 48 hours for your personal verification to be completed.
You can now view every verification request in the dropdown menu of your advertising account. You can also track the status there.
How can I verify my phone number in the Meta Business Manager?
There is now another small change: you now have to verify a phone number to get started.
However, you will only be asked to do this in Ads Manager when you create your first campaign.
All you have to do is enter your desired number and have a verification code sent to you. Then enter this code and you're ready to go.
How can I verify my domain in the Meta Business Manager? (legacy)
Good news for you, if that’s what you were looking for: you no longer need to verify your domain in Meta Business Manager.
You also no longer need to claim your domain in the Meta Business Manager.
All you need to do is install the Meta Pixel on your website to track conversions.
FAQ: What else do I need to know about the Meta Business Manager?
How much does the Meta Business Manager cost?
The Business Manager itself is completely free—you don't pay any usage fees.
However, you do have to pay for:
Running campaigns
The service provider (agency or freelancer)
Do I need a Google Account in order to set up the Meta Business Manager?
You don’t need a Google Account just to set up Meta Business Manager.
BUT, you’ll need a Google Account as soon as you:
Want to integrate the Meta Pixel into Google Tag Manager. You need a Google Account to create a Google Tag Manager account.
Want to connect the Meta Pixel to Google Analytics, or generally track your traffic from Meta in Google Analytics. You need a Google account to set up Google Analytics.
Want to automatically forward your Instant Leads from Meta to a Google Sheet.
Want to view reporting for your Meta Ads in Looker Studio.
Verification emails from Meta aren’t arriving in my business email inbox. What can I do?
For some business email addresses, emails from Meta don’t arrive because they’re blocked by the server.
In this case, contact the system administrator for your email account.
Do you need help setting up your Meta Business Manager?

That's quite a lot of stuff to take care of.
If you need help setting it up, just let me know. As a 2x
Meta-certified media planner, I’ve done this hundreds of times.
I’ll guide you through every step professionally via video call:


Comments